
You are just getting started on a project and need to familiarize yourself with the building. The architect just sent their current version of the Revit model. Consider the items in the following list to help get things off to a good start.
1. In the Options dialog, on Rendering section, set Render Appearance path to a custom “Revit Textures” folder you create on the network. Copy any texture files provided by the architect (e.g. jpg or png files). This will help with any visualization or VR you might want to do from an MEP perspective.

2. Open architectural model in Revizto to review
Revizto is a third-party collaboration tool that works with Revit and Navisworks.
a. Switch to the default 3D view
i. Set Detail Level to Fine
ii. Note the current Phase setting
iii. Set Phase Filter to Show Complete
b. On the Revizto 4 tab, select Export to Revizto
i. Sign in (to your Revizto account, if not already signed in)
ii. Follow the prompts
iii. Make sure all boxed are checked (see 2 images below)
c. Things you can do in Revizto:
i. Use the 3D Connexion Mouse (or Xbox controller, or W,A,S,D keys and mouse)
ii. Use section tool
iii. Use filter tool to look at existing MEP and Struct
iv. Use room list
v. Select element to view properties
vi. Review sheets
vii. Overlay sheet view on 3D model
 |
| Export to Revizto options |
 |
| Revizto with section cut and measurement below desk |
3. CTC Project Cleaner option
This is an option you could do prior to sharing files, and/or you could run it on Revit files you receive from architects. This step is not required, especially on smaller projects, but is a nice option if you want to ensure files are clean and lean…
Tip: I recommend saving the original unaltered Revit file in an “archive” or “drawings from” folder – even if not using this cleaner tool.
a. Open Revit model
b. Select Revit Express Tools tab -> Project Cleaner
c. Delete all views
i. Possibly leave some plan views (primary arch)
ii. May need these for linking purposes in your model
d. Delete all sheets, Drafting Views, DWG links and Schedules
e. Purge all
f. Save and close file
 |
| A free tool from CTC Express Tools |
4. What has changed (if this is not the first model share)
What has changed since we received the last model update? CTC Express Tools is also a third-party add-in.
a. Use CTC Model Compare or Bluebeam Revue Document Compare
5. Verify links and paths
Does this file have any links defined and are they files we need
a. Select Manager tab -> Phases
b. Warnings are given for missing links when opening
c. Manage tab -> Manage Links
d. Review Revit and DWG tabs

6. Also verify these important items:
a. Phasing
Review how many phases have been defined
i. Waring: Only having one phase is a problem with Phase Mapping and leads to graphical issues
ii. Are they bending the rules and using a pre-existing phase to manage wall or frame types? Or a future phase to override all materials to render a cardboard-type image?

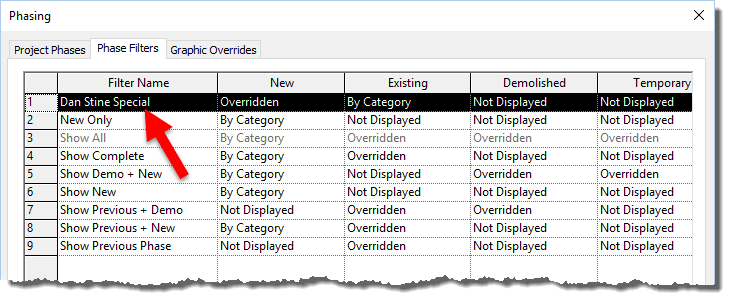
b. Review Phase Filter list
This is a little-known issue that can cause graphics headaches
i. If Arch uses unique Phase Filters you HAVE to create the same ones in your model(s)
ii. Show example of problem (future post)
c. Design Options
Did the architecture use Design Options? Do any of them apply to us?
i. Click the Design Options icon at the bottom of the Revit window.
ii. One furniture option may not apply, and another related to bidding does (see image below)

d. Review Worksets
Review worksets to see if they are using them to do some tricky visibility control as this may affect you.
i. If you have to use Worksets to control visibility (not recommended), be sure to “preserve worksets” when opening provided consultant models detached.
ii. TIP: Same-named worksets in linked models are automatically connected.
e. Scope Boxes
A Scope Box can be used to control the Crop Region for multiple views. If Arch is using it, you may want to consider it so your views match their layout.
f. Has True North been set yet?
If not, and they change it later this has been known to cause issues.
i. In a plan view, change the Orientation parameter from Project North to True North
ii. If the model did not rotate, then true north is likely not set
iii. Undo when done
FYI: True North must be set for sun/solar studies and any energy modelling
7. Light Fixtures and Plumbing Fixtures
Does the Arch model have any MEP elements?
a. Who owns MEP elements
b. Lights should be in MEP model, and plumbing fixtures are often in architectural model
i. Cannot connect to elements through link
ii. Can use Copy/Monitor for plumbing fixtures, with special family
iii. Electrical needs light fixtures in their model for lighting analysis programs
8. Review Warnings
Review quantity and types of warnings as this can affect accuracy and performance.
a. Manage tab -> Warnings
9. Close the Arch model
Finally, compare this list to the similar items one can review from within the Revit MEP model per these two previous posts: